


Thirty years ago, owner’s manuals for vehicles used to detail how to strip down the gearbox and rebuild it yourself. These days, they tell you not to drink the battery acid and how to find the colour-coded caps for the coolant tank. People’s reluctance to tackle basic motorhome faults and fear of ‘modern vehicles’ with their ‘complex computers’ has created this malaise.
However, the reality is that the best motorhomes can be relatively easy to work on (they often tell you what’s wrong with them, thanks to the ECU!) and ‘van habitation sections are still largely handbuilt.
So if you’re willing to learn a few basic skills and invest in some hand tools, you can usually fix most minor common motorhome faults yourself. These are the types of motorhome maintenance tasks that can save you money, avoid wasting time visiting a dealer and help keep your holiday on track. It’s a win-win!
Tackling common motorhome faults
Still under warranty?
Only just bought it?
Dealer not playing ball?
Going DIY?
Electrical issues
Problems with the tyres
Water ingress
Habitation checks
Still under warranty?
It’s essential to understand if your vehicle is still under warranty before diving into your motorhome tool kit, and there are often several warranties in force on new or nearly new vehicles.
For a start, there’s the base vehicle warranty and the habitation area warranty. Many appliances also have their own warranty attached to them. These can all vary in length, so the first task is always to read your bill of sale and check the paperwork supplied with your vehicle, to see whether the issue in question is covered under any of the maker’s warranties.
This might mean you don’t have to fix (and pay for) it yourself and might save you any undue effort. You need to be clear on where to take the vehicle, though. Obviously, it’s no good going to a Fiat Professional dealer if there’s a problem with the Dometic toilet (and don’t laugh, it has happened…).

Equally, don’t be fobbed off by either your supplying motorhome dealer or the habitation manufacturer. Some firms like to blame the other party and want you to play ping-pong between the base vehicle manufacturer and the habitation company.
If this happens to you, contact the supplying dealership – as sellers, they are liable for the contract.
Only just bought it?
If the ’van has only just been purchased – whether you’re buying a used motorhome or a new ‘van – and has immediately developed a problem, your first contact should always be the supplying dealer.
As the seller, they are liable for your contract under the Consumer Rights Act 2015. The Act states that goods have to be of satisfactory quality, fit for purpose and as described.
If you bought the vehicle (or any product) within 30 days, you have the right to reject the goods and claim a full refund.
After 30 days, you’re not legally entitled to a full refund, but you can request the dealership to repair or replace the vehicle.
During the six-month period after you have bought the vehicle or the product, if any fault develops in it, then it is assumed that the fault was there at the time of purchase.
The onus is then on the dealer to prove the fault wasn’t present at the time of purchase and offer either a repair or a mutually agreed refund.
Dealer not playing ball?
Occasionally, we hear tales of dealers and manufacturers not playing ball and refusing to fix things under warranty that they rightfully should.
In this scenario, make sure that you keep a paper trail – either printed or email – of all relevant correspondence and raise the matter in writing with the manufacturer’s complaints or customer service department.
Thanks to recent changes in the Consumer Rights Act, this is now a pretty powerful piece of legislation and most companies are wise to it.
If this still fails to get any results, lodge a complaint with the Small Claims Court.
The Small Claims Court is an effective tool and can be used for claims of up to £10,000, with costs ranging from £35 to £455. It can also be used for items up to £200,000 (for 5% of the claim value) or even higher claims.
Companies rarely want to go to court to defend Small Claims, so will often settle before they get anywhere near court. It is not a complex process to go through – you can easily apply online and don’t need the cost of a solicitor – and can be surprisingly effective.
Going DIY?
If your vehicle is out of warranty or an older model you’ve had for some time, then it often makes good financial sense to roll up your sleeves and fix it yourself. You’ll save time and cash.
The good news is, the vast majority of motorhome conversions are built by hand. By humans just like you. So they can be fixed by a human, too.

As our contributor Diamond Dave said recently, it’s important to be self-aware as to your abilities, though, or be patient and willing to learn a new skill.
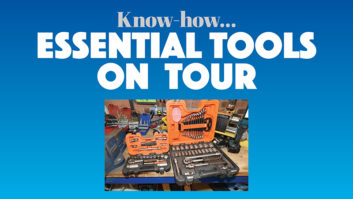
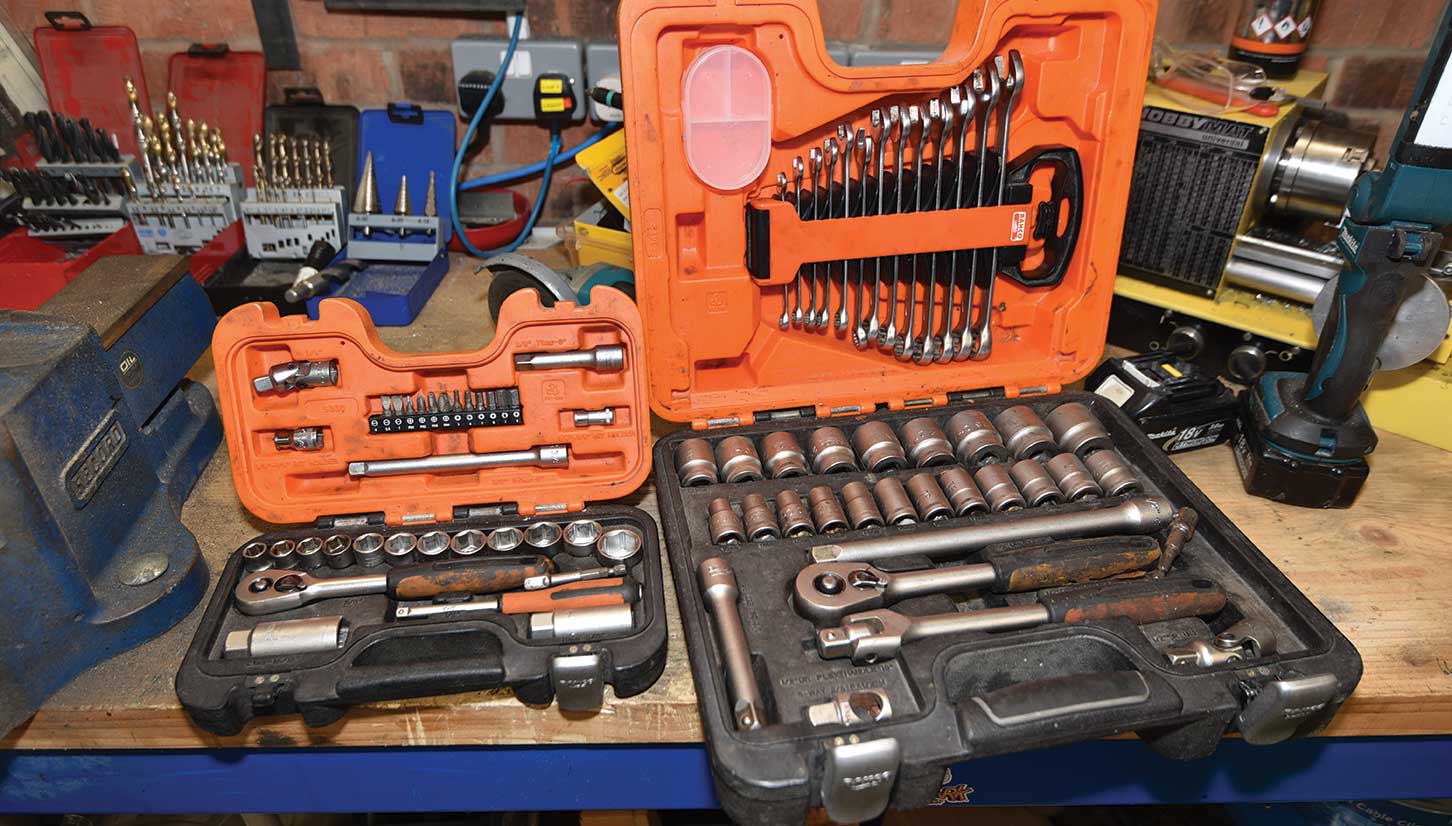
It also helps to have a basic toolkit, including a socket set, a selection of screwdrivers, a hammer and some pliers. Halfords sells some excellent all-in-one-box tool sets and their Advanced range even comes with a lifetime warranty, so they’re highly recommended. We’d also highly recommend buying a multimeter.
Before you invest in any tools, though, do a bit of online research on the task you’re considering. You’ll generally find a forum, or better still a video, detailing the work to give you a better understanding of what the job entails. Sometimes you’ll want to have a crack at it and at other times, it will help you leave well alone and head to your local dealer! Either way, do your homework before digging in.
Often, you’ll find the issue you’re dealing with is one that many people have also had and found various ways to solve. This will not only save wasting time visiting the dealer, but also save you money. In addition, there’s a great satisfaction in fixing things yourself and not being reliant on others.
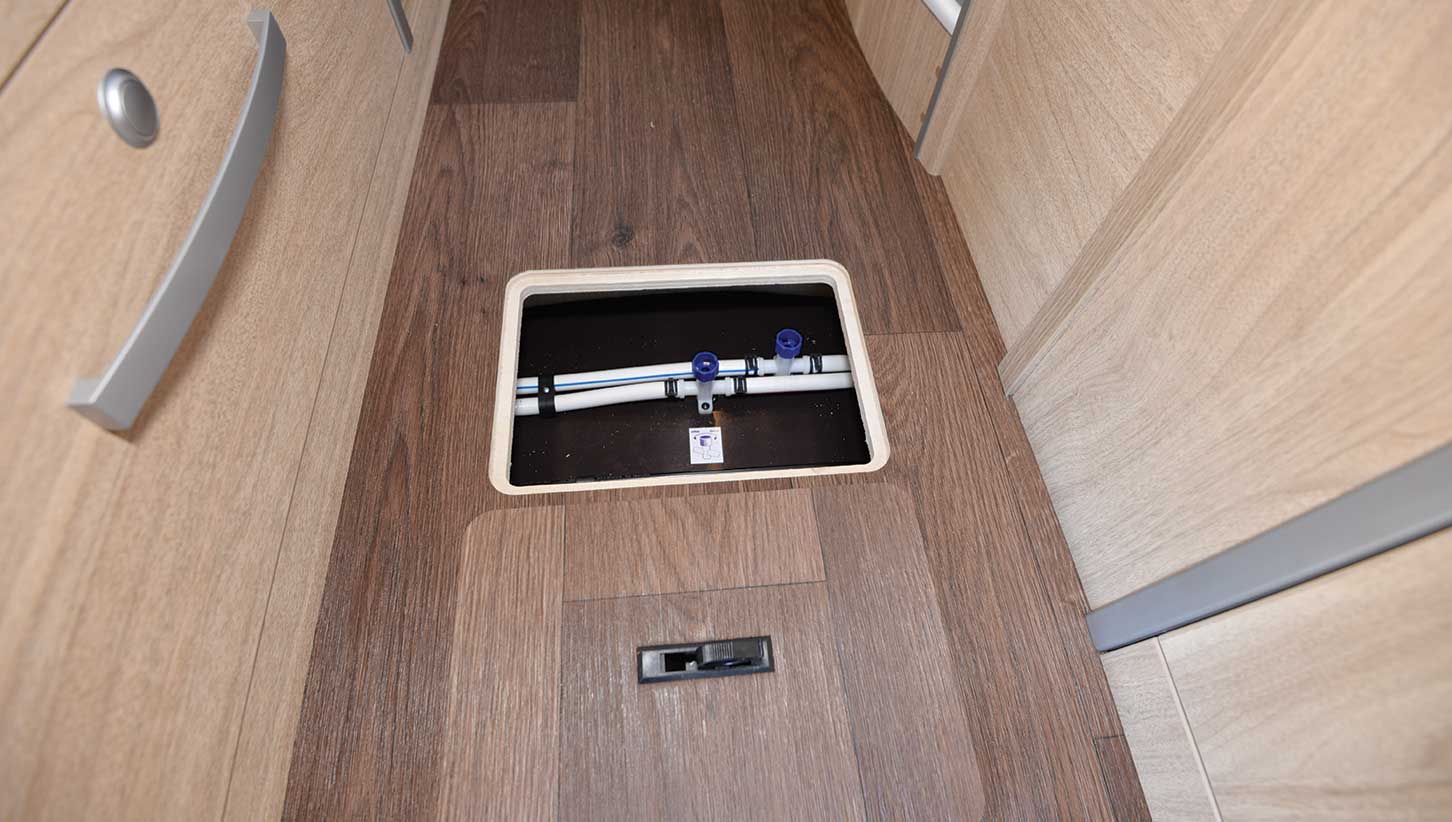
Electrical issues
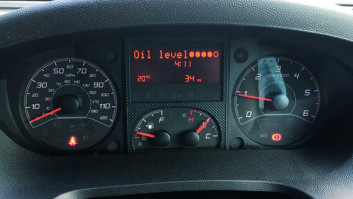
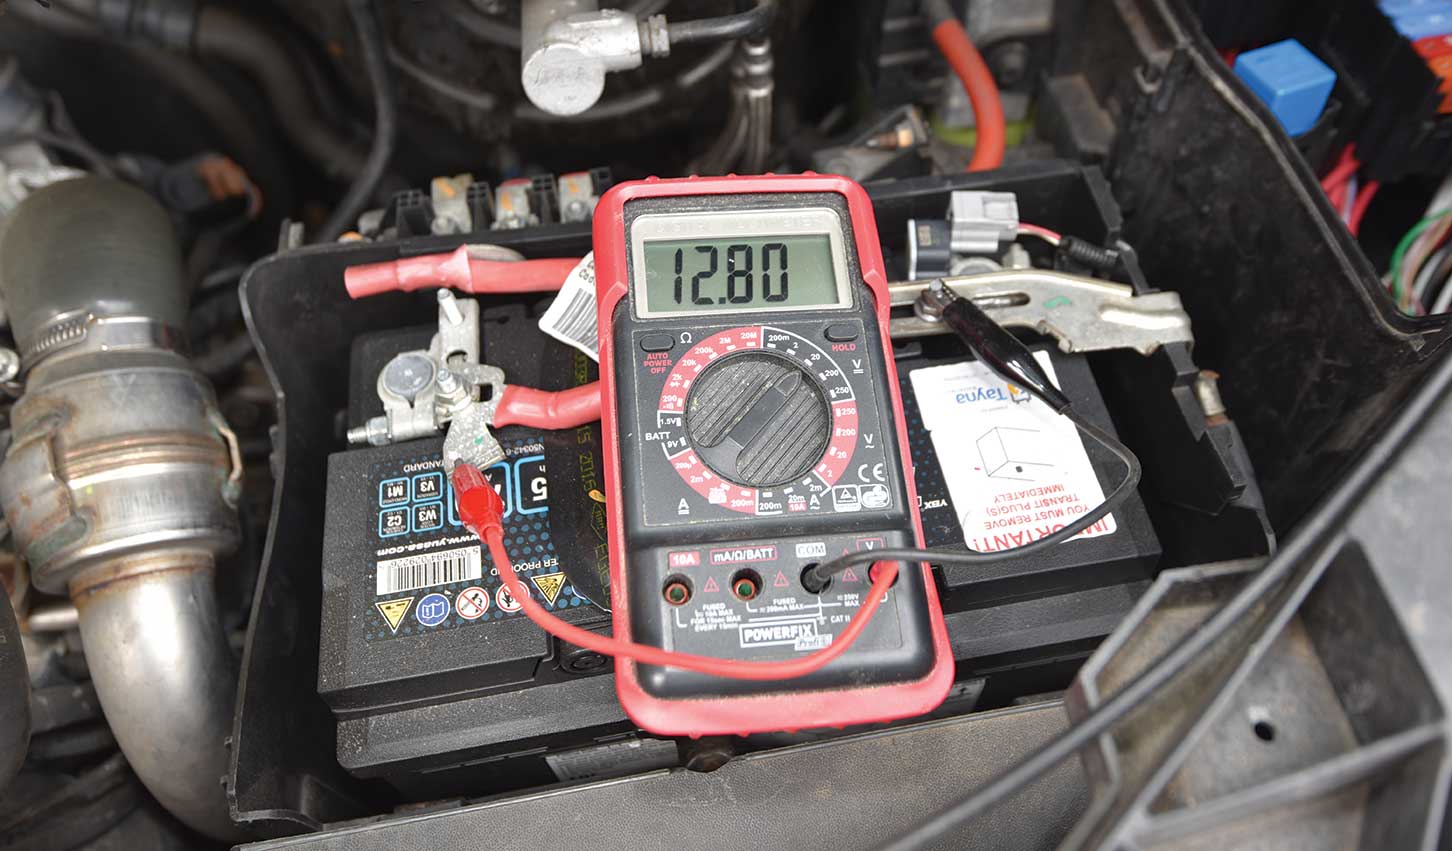
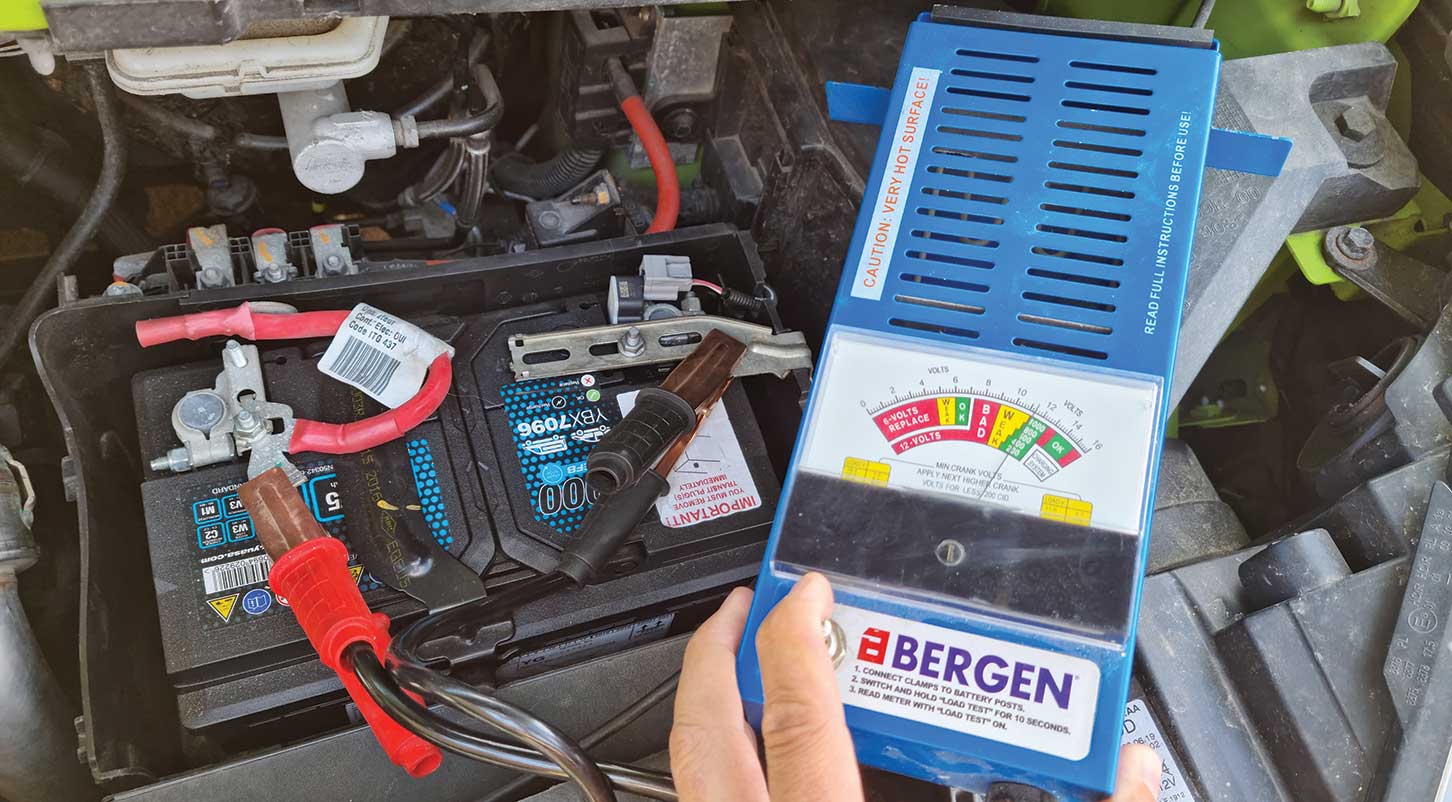
By far the largest cause of complaint in modern ’vans has to be electrical issues. The vast majority are caused by low battery voltage, damaged batteries or earth strap faults.
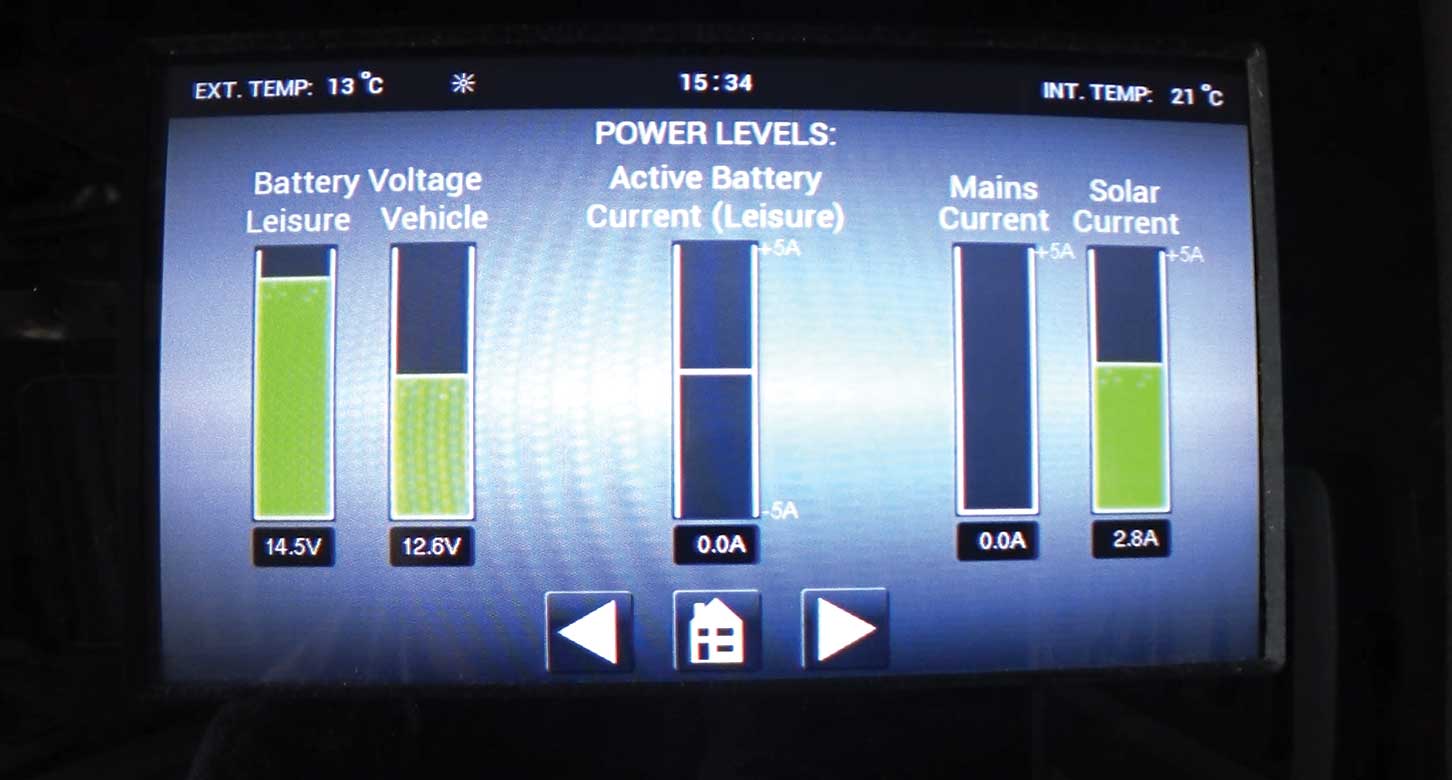
No matter what electrical issues are presented on the vehicle – warning lights on the dash or malfunctioning habitation equipment – always start with the basics and check the battery voltages: 12.7-12.9V is fully charged, while 12V is flat.
Warning lights and appliance faults can often be triggered in error by a faulty (or low-voltage) battery, so always check that before you believe control panels or dashboards.

If electrical items don’t see enough voltage, they can trigger erroneously and lead you on a wild goose chase. Step one is always check the voltage.
It helps to invest in a multimeter to check voltage – they can cost as little as a tenner – because control panels can misinform you when they suffer low voltage. It’s a second opinion that can prevent problems.

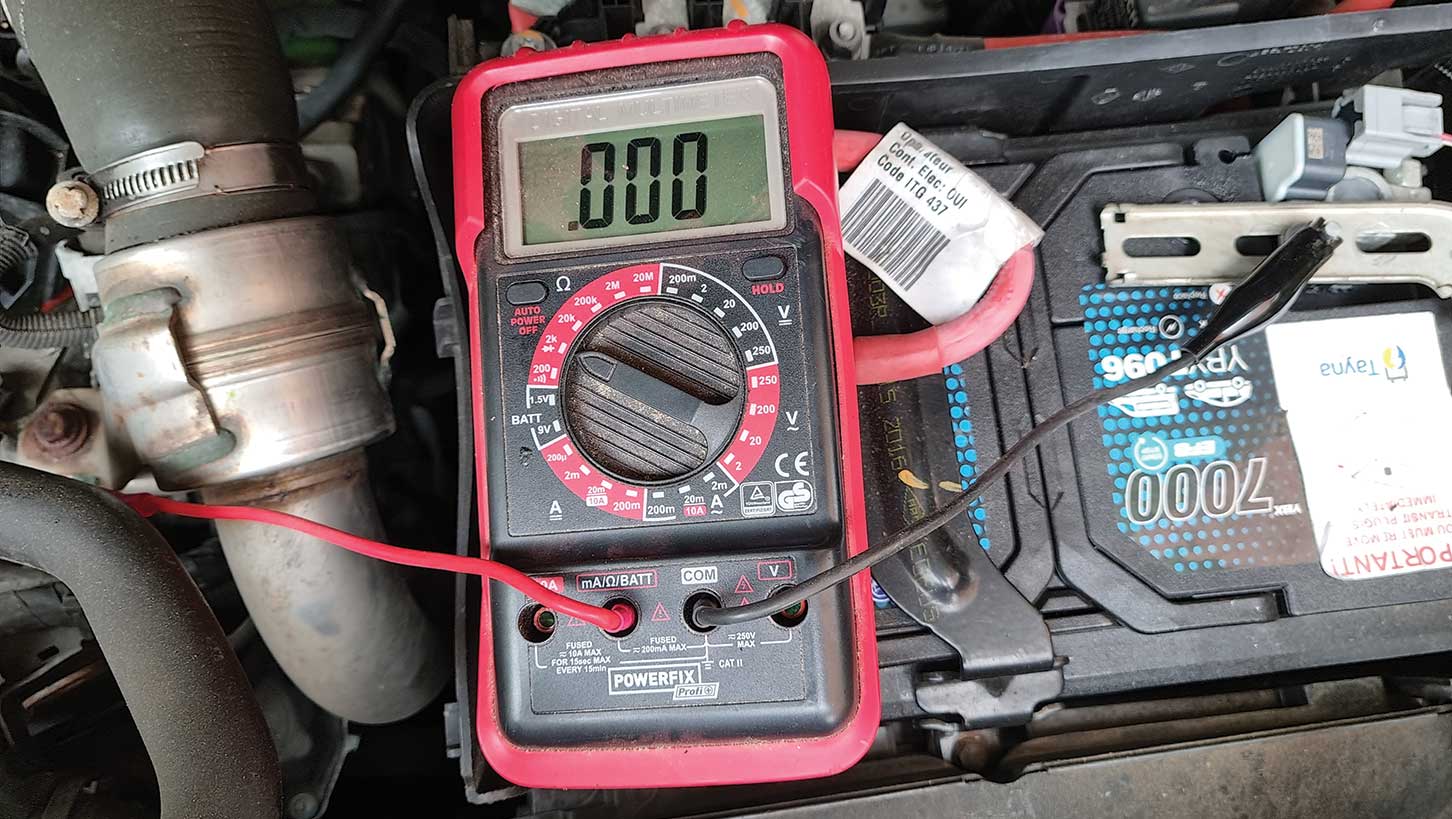
You can also use a multimeter to check for high resistance on earth straps. Set it to ohms and measure the reading between the negative (black terminal) on the battery and the metal structure of the vehicle. It should read zero, or very close to zero. Anything higher – even a reading of 0.1ohm –indicates an issue with the grounding strap. Try removing it from the chassis, cleaning the strap and the area around its fixing and remeasuring it.

It’s also wise to add a second strap (and between engine and chassis) and there are often lots of spare studs that can easily be used for this. Halfords sells a variety of earthing straps.
If the voltage and the earthing strap resistance are fine, check all the fuses and replace any failed ones with the current amp rating. Never increase the fuse rating if one fails: fuses are designed to protect the wiring and increasing the rating risks overloading the wiring, which can cause a fire if the wire melts before the fuse.
If voltage, earthing strap resistance and fuses are fine, but you still have issues, you’ll need to consider having the battery drop-tested, which loads up the battery and tests its ‘strength’.

Sometimes batteries appear to be okay, hold their charge and act fine, but then can’t sustain a heavy load. You can buy a basic battery load tester for as little as £30.
If your leisure battery (see: the best campervan leisure battery if you’re on the hunt for one) can’t support the load of an inverter, or your starter battery struggles to turn over the engine, it could well point to battery issues. Batteries often fail in the colder months as temperature affects their capacity, which is why winter battery care is so important.
If the batteries check out, you’ll need to dig a little deeper and may have to get a dealer to do an electrical check. But make sure they test the battery first – main base vehicle dealers are all too eager to plug in a code reader, but the information can be useless if the ECU isn’t seeing the correct voltage. A faulty alternator can cause all manner of electrical errors, so ensure the dealer checks that as well.
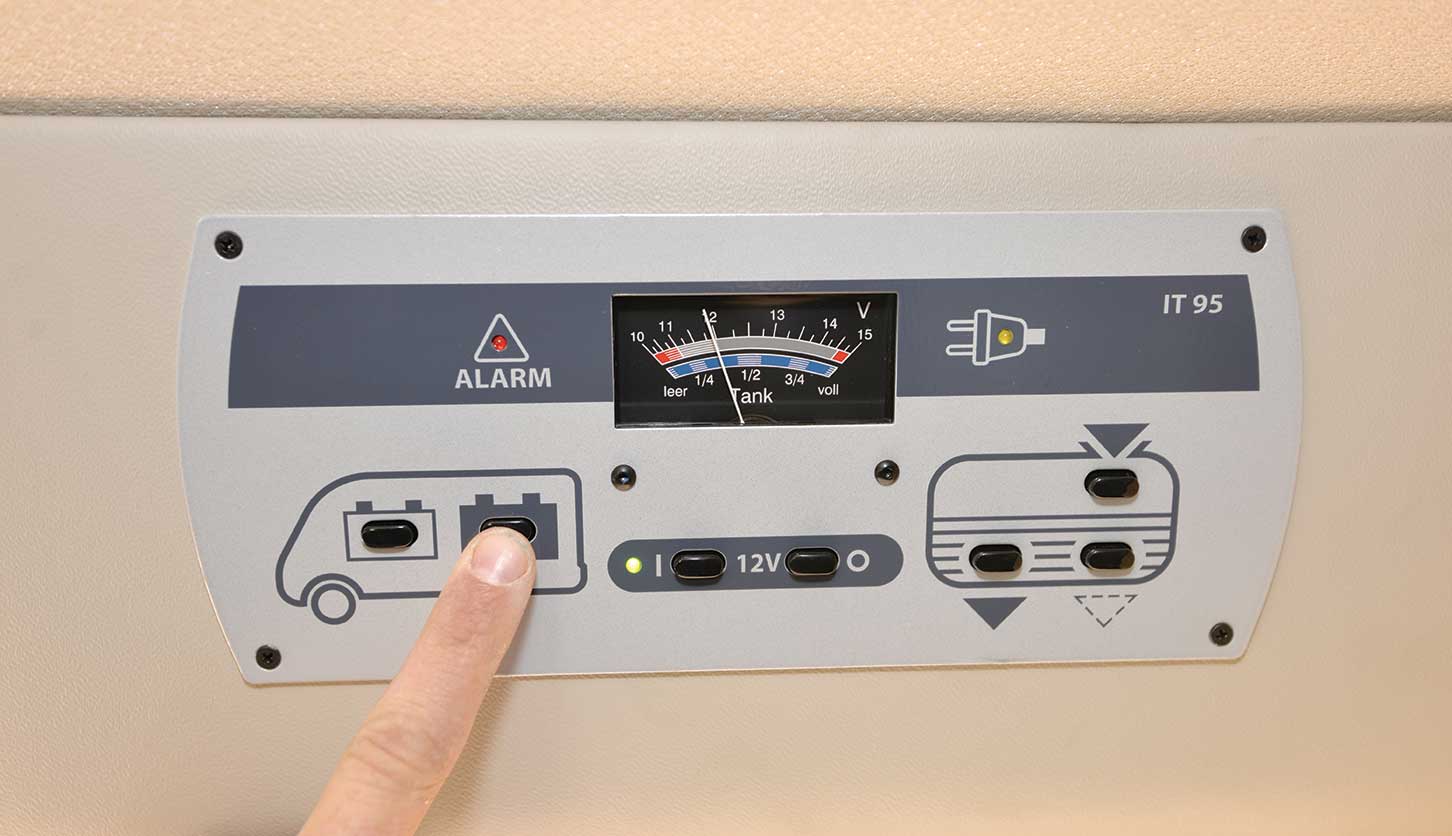
Another commonly seen problem is modern control panels, which can be very complicated.

Unlike older control panels, which used a series of intuitive rocker switches, modern panels have many settings and can feel as though they’re designed by computer geeks, not motorhomers.

Without reading the manual (or watching the instructional video), you can inadvertently set it up incorrectly and switch off the battery-charging circuits. This is common, so make sure you read and understand the owner’s manual, or have your dealership run through its operation so that you’re crystal clear on all of the settings.
Problems with the tyres
Your motorhome tyres will rarely be covered by any warranty, because they are viewed very much as a ‘wear and tear’ item (as are brakes, clutches and exhausts). However, they can cause problems on motorhomes, especially if you’re storing the motorhome in winter and it has been inactive.
Let’s begin with the motorhome tyre pressure. Inflate the tyres to the maximum pressure detailed on the sidewalls prior to your vehicle’s winter lay-up, and try to move it once in a while, so that it is not standing on the same contact patch for long periods of time.
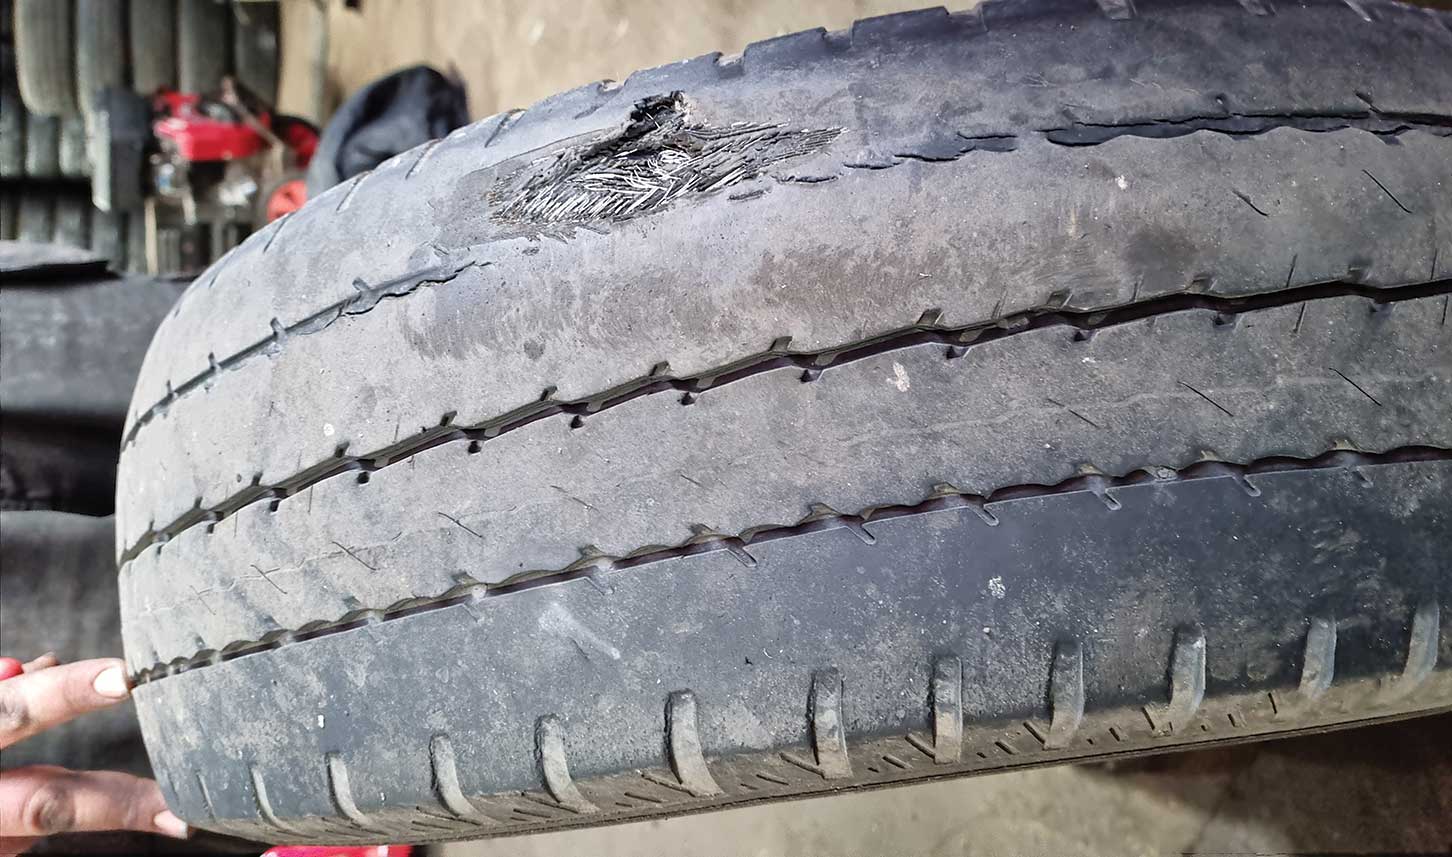
Left in one position for long spells, tyres can go egg-shaped, owing to the weight of the vehicle pressing on them. Flat spots are usually felt as vibrations through the steering wheel and, unlike vibrations from wheels that require balancing, these are constant, rather than speed-dependent. Sometimes, the flat spot on a tyre will sort itself out when the tyre heats up – while on a motorway, for example – but if the vibration persists, you might find that you need to have them replaced.

If left unattended, the tip of the egg shape can wear away to a hole and cause a blow-out, so you do need to check the tread of the whole tyre very carefully, to look for any evidence of uneven wear or damage.
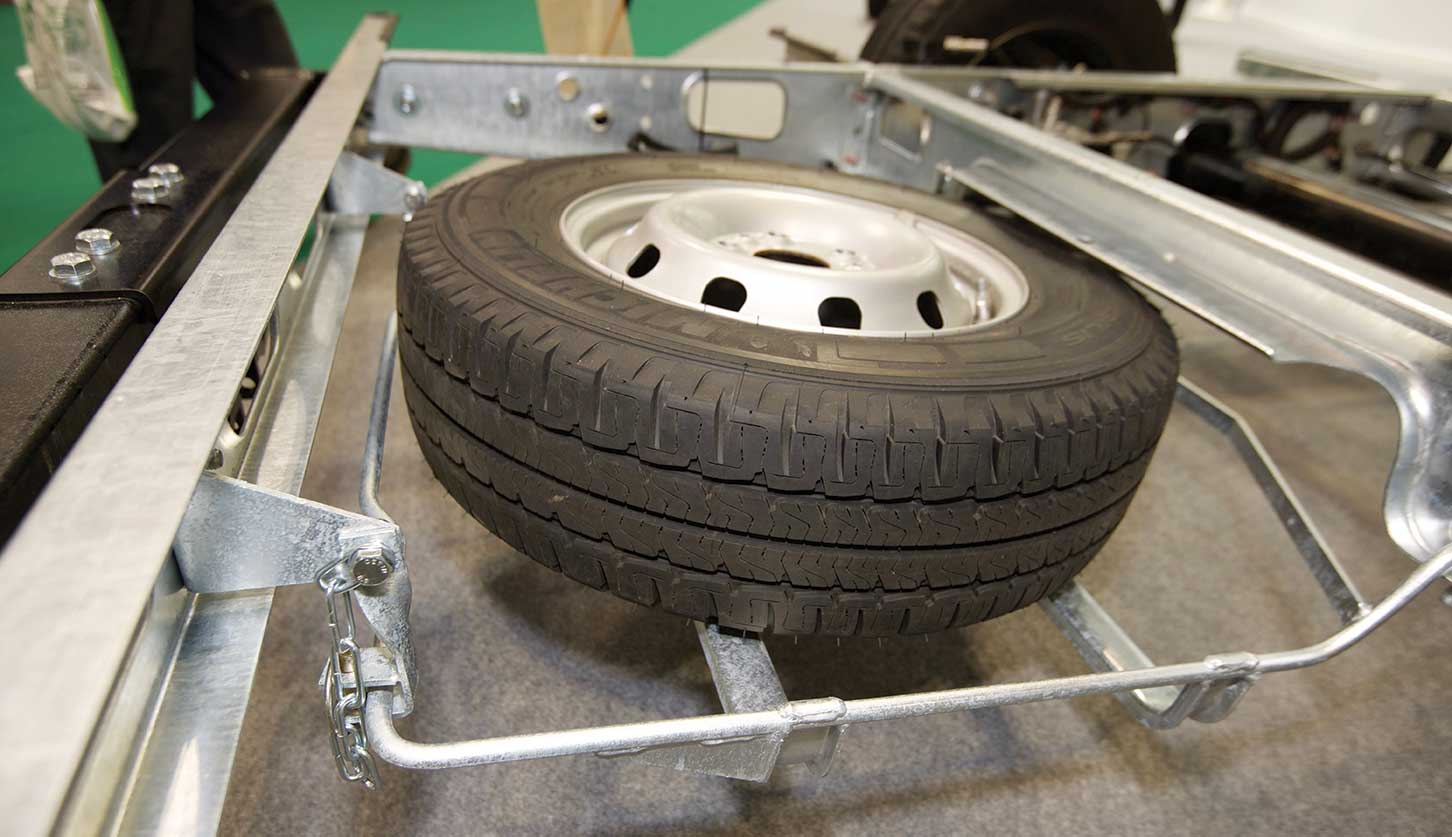
Punctures are not that uncommon in motorhomes – they’re big and heavy vehicles that are hard on their tyres – so it’s always wise to carry a spare wheel (or just a tyre if your payload is tight) so you can change a motorhome tyre if necessary.
The main point here is that certain motorhome-specific tyres are only manufactured in limited batches and you can’t always get hold of them quickly and easily.

While tyre sealant and foam work well for minor tyre damage – such as nails, screws or thorns – they’re not much use for blow-outs, tears or larger damage. It used to be mandatory for all vehicles to carry a spare wheel and it should be so today, too – breakdown services often have to spend a great deal of time sourcing spare wheels, which can really eat into your prized holiday time if you’re not prepared.
The vast majority of garages only keep common car tyres in stock and if you experience a flat in France on a Sunday, you will be stranded for some time if you lack a spare.

To avoid problems, always check that your tyres are correctly inflated to the manufacturer-recommended pressures (or better still, visit a weighbridge, weigh each axle and ask your tyre maker for pressure recommendations). Never skimp on your tyres, either – a premium tyre will last longer and stop in a shorter distance in wet conditions than an unbranded budget tyre.
Water ingress
Water ingress is one of the most serious issues to watch for in your motorhome. Apart from an engine swap, it’s probably the single most costly problem to sort out. It can take the form of something very small – such as a failing window frame seal – and then develop into a much more serious matter.
Signs of ingress range from water stains on the ceiling to damp stains behind furniture or under windows. You can often smell the problem before you see it – a ‘wet dog’ or musty odour is a sure sign something is amiss.

Warping panels or spongy floors are signs of more advanced water ingress and must be tackled immediately, as water ingress spreads if left untreated.
The best way to avoid it is to have an annual habitation check carried out. These act as an early warning system and dealers often use very expensive specialist gauges to investigate.
If you have ingress around a door, window or rooflight, check the rubber seal. You might be able to replace this on its own – many just knock into place – or dismantle it and reseal with setting or non-setting mastic, depending on manufacturer’s recommendations.

Typically, mastics and polyurethane sealants (such as Sikaflex) cost less than £20 a tube, so they won’t break the bank. You can also buy two-part products to deal with more serious damage (for example, to the floor) and these can be effective. But this is best left to professionals or seasoned DIYers.
Habitation checks
Unlike base vehicle servicing, some owners regard habitation checks as optional. This can be a false economy, as these inspections can act as an early warning of future issues. Picking up signs of damp or a problem with your gas system at an early stage can help to prevent it from developing into a major, and far more costly, issue.
Make sure that your habitation check includes not only the basics, such as testing the motorhome gas system for leaks, but also a more comprehensive assessment with a damp meter. Sometimes water ingress checks are an extra option, but they are always worth doing.
On my own ’van, a habitation check indicated damp in the garage, which I hadn’t spotted. This was traced to the garage door frame, which needed to be resealed. This was rapidly sorted out for minimal cost and the problem never came back. Left untreated, it could have developed into a serious case of rot, requiring costly rectification work.
Don’t forget the importance of cleaning a motorhome either, a crucial task in achieving a sparkling van.
Future Publishing Limited, the publisher of Practical Motorhome, provides the information in this article in good faith and makes no representation as to its completeness or accuracy. Individuals carrying out the instructions do so at their own risk and must exercise their independent judgement in determining the appropriateness of the advice to their circumstances and skill level. References to specific products are for illustration only and not intended as recommendation. To the fullest extent permitted by law, neither Future nor its employees or agents shall have any liability in connection with the use of this information. Double check any warranty is not affected before proceeding.
If you’ve enjoyed reading this article, why not get the latest news, reviews and features delivered direct to your door or inbox every month. Take advantage of our brilliant Practical Motorhome magazine SUBSCRIBERS’ OFFER and SIGN UP TO OUR NEWSLETTER for regular weekly updates on all things motorhome related.